So you want to create a ModelGlue:Unity application? ( Part 5 )

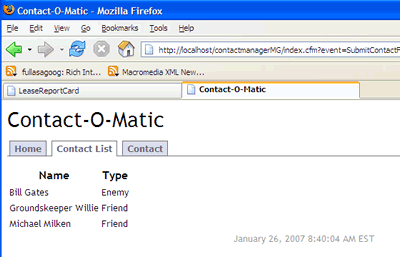
Previously in this series, we installed the ModelGlue:Unity framework and the ColdSpring framework. We used the ModelGlueApplicationTemplate as the skeleton, added our basic flow and navigation. We can save and list contacts and our validation is working nicely,

In this section of our Contact-O-Matic, we will pull out the contact types values from coldspring and used them to add defined categories to our contacts. In a previous segment, we added the Contact Types as a 'map' in ColdSpring, now we will pull out the values and add them to our form.

Inside the *ContactManagerMG/Config/ColdSpring.xml file the bean definition for ContactService.cfc looks like this:

view plain print about
1<bean id="ContactService" class="ContactManagerMG.model.ContactService">
2    <property name="ContactTypes">
3        <map>
4            <entry key="Friend"><value>Friend</value></entry>
5            <entry key="Co-Worker"><value>Co-Worker</value></entry>
6            <entry key="Enemy"><value>Enemy</value></entry>
7        </map>
8    </property>
9    <property name="ContactList">
10        <list></list>
11    </property>    
12</bean>

In order to provide a proper separation in our code, we add a new 'message-listener' tag with the message attribute of 'needContactTypes' and the function attribute of 'getContactTypes'.

view plain print about
1<message-listener message="needContactTypes" function="getContactTypes" />

Then in our 'contact.view' event-handler, add a new message tag inside broadcasts tag. Your 'contact.view' event-handler should look as follows:

view plain print about
1<event-handler name="contact.view">
2    <broadcasts>
3        <message name="needContactForm" />
4        <message name="needContactTypes" />
5    </broadcasts>
6    <views>
7        &lt;include name="body" template="frmContact.cfm">

8            <value name="whichMenuIsCurrent" value="contact.view" />
9        &lt;/include>
10    </views>
11    <results>
12        <result do="view.template" />
13    </results>
14</event-handler>

Note: If copying this code directly, you must change the & lt; to a proper <

Next, in our *ContactManagerMG.controller.controller.cfc, we add a new function called 'getContactTypes'. This function will pull out the 'ContactTypes' map, or struct, from our ContactService and place them in the event.

view plain print about
1<cffunction name="getContactTypes" access="public" returntype="void" output="false">
2    <cfargument name="event" type="any" />
3     <cfset var ContactService = getModelGlue().getBean( "ContactService") />
4     <cfset arguments.event.setValue( "ContactTypes", ContactService.getContactTypes() ) />
5</cffunction>

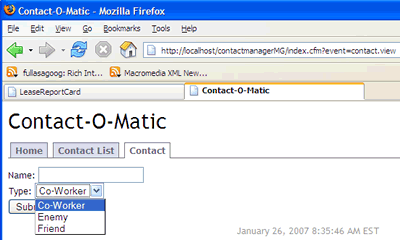
Finally, we open our form, located at *ContactManagerMG/views/frmContact.cfm. Pull out the ContactTypes from the event and loop through to create a select box of values. Your completed form should look like this:

view plain print about
1<cfset myself = viewstate.getValue("myself") />
2<cfset ContactFormBean = viewstate.getValue("ContactFormBean") />
3<cfset ErrorStruct = viewstate.getValue("ErrorStruct", structNew()) />
4<cfset ContactTypes = viewstate.getValue("ContactTypes") />
5
6<cfoutput>
7    
8    <cfif structCount( ErrorStruct ) GT 0 >
9        <cfloop collection="#ErrorStruct#" item="errorType">
10            <li>#ErrorStruct[ errorType ]#</li>
11        </cfloop>
12    </cfif>
13    
14<form id="ContactForm" action="#myself#SubmitContactForm" method="post">
15    <input type="hidden" name="contactID" value="#ContactFormBean.getContactID()#" />
16Name: <input type="text" name="ContactName" value="#ContactFormBean.getContactName()#"><br />
17Type: <select name="ContactType">
18    <cfloop collection="#ContactTypes#" item="thisType">
19        <option value="#thisType#" <cfif ContactFormBean.getContactType() IS thisType>selected</cfif>>#ContactTypes[thisType]#</option>
20    </cfloop>
21    </select>
22    <br />
23    <input type="submit" name="submit" value="Submit" />    
24
25</form>
26</cfoutput>

Once you reset your application and click the 'contact' tab, you should have a functional select box in your form.

Look Ma, a select box

Proper application design would most likely not include storing the data for your select boxes inside coldspring. After all, that is what a database is for. The purpose of this exercise is to show how to retrieve data from ColdSpring to use in your applications.

A practical use of ColdSpring would be to define an email service inside ColdSpring to operate in two modes, production and development. In production mode, the email service would send emails to each email it was passed. In development mode, the email service would send an email to a developer email address. Thus, changing from development mode to production mode is as easy as changing a line in your ColdSpring.xml file.

If you have ever accidently spammed your users whilst testing application email functionality, you can appreciate the benefits ColdSpring offers.

The fruits of our labor

Yay! data integrity

There are no comments for this entry.

Add Comment Subscribe to Comments

9/12/08 3:50 PM # Posted By John Allen

<blockquote><i>"If you have ever accidently spammed your users whilst testing application email functionality, you can appreciate the benefits ColdSpring offers."</i></blockquote>

LOL... that is to perfect.